Wednesday, November 18, 2015

NFS Volume Max Out Error Message in vSphere 5.5

A few days ago, I tried mounting a NFS volume I created to my ESXi hosts and I get the following annoying error message:

Failed to mount to server xxx.xxx.xxxx.xxx mount point /mnt/nfs-share/subdir/subdir. NFS has reached the maximum number of supported volumes.

Gosh it is annoying! So I decide to share the solution on this quick post here. It is very simple and undisruptive ( no reboot to any of the ESXi host require) That is alwas good right?

From the vSphere Client:

  1. Select the ESXi host you want to mount the NFS volume
  2. Under the Configuration Tab, select Software Advanced Settings
  3. Select NFS, look for NFS.MaxVolumes You will notice the default value is 8
  1. Change the value to a number between the Min and Max Range, I normally select the Max
                 5. Click OK and that's it no reboot require or anything. Repeat all this steps to the rest of your hosts.

If you are a vSphere Web Client admin, here are the step I followed:

  1. Go to Host and Cluster
  2. Select the host I need to mount the NFS volume
  3. Under Manage Tab, Settings, Select Advanced System Settings
  1. Search for the NFS.MaxVolumes on the Filter field at the top right hand side or just simple scroll down until you find it
  1. Click on the Edit Pencil at the left hand side
  1. Enter the Value require, I personally enter the Max allowed:

  1. Click OK and you are done.

Sunday, November 15, 2015

NetApp SnapMirror Between 8.2 and 8.3 Gotcha!

Last week I attempt to create a snapmirror job between two NetApp running on different version and it was quite challenge to setup I decide to share them with everyone since they are quite difficult to troubleshoot them. Here are the two gotcha that you have to be aware and how to tackle them.


1. Unable to use GUI System Manager: The only way you are able to fully manage the Snapmirror will be via the CLI. The only action you will be to manage from the GUI are update, quiescence and abort, that's about it. The advantage, it get you more time on the CLI if you are like me that love the System Manager alot!

2. Language issue: Another gotcha I encounter was different language between SVMs. 8.3 does use different programing language than 8.2 which every volume will be set with the programming language set at the SVM level. So in order to make this work, I change the SVM programming language on my 8.3 to match the 8.2 SVM. So have you can do that? Here are the commands:

First, needs to show the vserver or vservers language:
GEEK::> vserver show -fields language
vserver  language
-------- --------
GEEKCIFS C
GEEKDR   en_US
GEEKESX  en_US
GEEKHyperV
         en_US
GEEKNAS  en_US
GEEKSAN  en
GEEKDemo  en_US
blatz    C
peacemaker
         C
9 entries were displayed.

You can see in the above example, some of them are C and some en_US.  

To modify the destination vserver language, use the following command:  

vserver modify -vserver <vservername> -language C

Note: You can’t change the language of an already created volume, so you’ll likely have to recreate the destination volume once you’ve changed the language (the volume inherits the SVM language).

I always recommend to run snapmirror on same ONTAP version for numerous reason such support, data consistency, performance and many other reason so try alway to keep your NetApp Enviroment up to date as much as possible. Hope this gotchas helps.

Monday, June 22, 2015

HTTP Status 404 - /triton/pages/eipProductContainer.jsf on Triton Websense Security Appliance Portal


After Rebooting a Websense Triton Web Security Appliance, I was unable to access the web portal due to the following error:

HTTP Status 404 - /triton/pages/eipProductContainer.jsf

Very frustrating specially when your IT VP needs to get a site blocked right away! So after many trial and error, I found this great respond from the Websense Forum with someone else having the exact issue, here is the link:  http://community.websense.com/forums/t/32246.aspx 

I put together the steps I followed to get the portal back online:

 1. Stop TRITON Web Security Stop TRITON Unified Security Center Stop TRITON Web Server Stop TRITON Settings    Database

2. Start TRITON Settings Database Start TRITON Web Server Start TRITON Unified Security Center Start TRITON       Web Security Wait for the services to fully start.

3
. You should now be able to connect to TRITON.


NOTE: Please, start and stop each service in the same sequence mention on each steps.


 After I followed this steps, I was able to access the web portal no issues. If none of this steps resolved the issue, I suggest to visit the link I posted for other steps to follow since this steps once again, were able to resolved my current issue.

Thursday, June 18, 2015

How to Modify the Management Port IP Address on a NetApp FAS 8020

 I few weeks ago NetApp Support contact us asking if were having issues with the Auto Support on both of our DR controllers. First they ask us to create a connector on our Exchange with the Node Management IP Addresses with Anonymous Authentication, even to verify that the ports on the switch were the e0M ports were plug in are on the same VLAN as the IP Addresses.

 After doing some research around both controllers, the e0M ports have the wrong IP Addresses, how that I find that our, I ran the following command from the CLI network interface show -curr-port e0M
which display the E0M ports configuration with the IP Addresses of the Management Logical Interface:

GEEK-CLUST::> network interface show -curr-port e0M
            Logical    Status     Network            Current       Current Is
Server      Interface  Admin/Oper Address/Mask       Node          Port    Home
----------- ---------- ---------- ------------------ ------------- ------- ----
GEEK-NODE1
                 
mgmt1      up/up      192.168.164.58/24    GEEK-NODE1   e0M    true
GEEK-NODE2
mgmt1      up/up      192.168.164.59/24    GEEK-NODE2   e0M    true

2 entries were displayed.


So how we can Re-IP those Management Logical Interface? Here are the Steps:

1. SSH to the Cluster's CLI by using the Cluster's Management IP Address.

2. Once on the CLI, we need to set the Advance Options by typing set advance

Note: a warning alert will come up as shown below:

 These advanced commands are potentially dangerous; use them only when directed to do so by
         NetApp personnel.
Do you want to continue? {y|n}:


If you don't feel comfortable, please type n otherwise type y and hit enter.

3. Once the Advance Options are set, we can now proceed to change the Management Logical Interface IP Address by typing the following command:

network interface modify -vserver <node_name> -lif mgmt1 -home-node <node_name> -home-port e0M -address <ip_address> -netmask <netmask>

4. Now re run the network interface show -curr-port e0M to verify the IP Address has changed.

Once I did the changes, Auto Support start working no problem. So next time you are breaking your head on why no Auto Support can be send, verify the Management Logical Interface as well the e0M port are configure properly with the correct IP Address as well connected on the back of the controllers.

Warning: You can also use this same commands to configure any other Interface as well however, this post was only intended to the Management e0M port.

Tuesday, May 26, 2015

How to clear the Email Cache in Outlook 2010 & 2013


Details:
E-mail Address Auto-Complete Outlook 2010 & Outlook 2013 have a feature called "Email Address Auto Complete". This feature allows you to type an email address into the "TO:", "CC:", or "BCC" fields. Outlook will display a list of corresponding e-mail addresses from the auto-complete cache. For example, e-mail addresses that you have already used.
Solution:
To Clear the E-Mail Cache:

Solution 1:   Manually Delete    (For ALL Versions of Outlook)
1. Open Outlook.
2. Type the e-mail address you wish to clear from the cache.
3. Press the Down-Arrow button (on the keyboard) to select the e-mail address.
4. Press the Delete button (on the keyboard).
5. That e-mail entry is now removed from the Outlook Auto-complete cache.
Solution 2:  Empty Auto-Complete List Button    (ONLY for Outlook Versions 2010 & 2013)
1. Open Outlook.
2. Click File Options.
3. Click on the Mail tab on the right.
4. Scroll down to Send messages and click the Empty Auto-Complete List button.

Cache Mode is gray out on Outlook 2010


Details:
This article will provide a workaround to enable or disable Cache Mode on Outlook 2010 when the check box is gray out.
Solution:
To Enable Cache Mode on:

1. Open REGEDIT

2. navigate to the following registry: HKEY_CURRENT_USER\Software\Policies\Microsoft\Office\14.0\outlook\cached mode

3. Modify Value on dword "Enable"=dword to 1

4. Close Registry Editor

5. Restart Outlook

 
To Disable Cache Mode on:

1. Open REGEDIT

2. navigate to the following registry: HKEY_CURRENT_USER\Software\Policies\Microsoft\Office\14.0\outlook\cached mode

3. Modify Value on dword "Enable"=dword to 0

4. Close Registry Editor

5. Restart Outlook

Friday, May 22, 2015

Removing Foreign Aggregate on NetApp ONTAP 8.2.1 Cluster Mode


So After installing a SAS Disk Shelf and assign ownership for all new disk, I notice that old aggregates from the previous filer were created as Foreign, This is a big problem. After doing some research, I was able to find the solution on a great KB from NetApp KB 1013046 using the Aggregate Destroy Command.

Note: Be very careful while going through this process as you can delete the wrong aggregate and it almost near impossible or impossible to restore an aggregate.

Here are the steps I follow it:

1. SSH to the Cluster.

2. Then Run the system node run -node * -command sysconfig -r command to identify the aggregate on Foreign State:


If the above output is to overwhelm, you can also uses the aggr status for each node by running the following command:

system node run -node <nodename> -command aggr status


Notice that the Output is more clear to identify does foreign aggregates.

3. Now that we identify does Foreign aggregates as well on which node, first we need to enable the Aggregate Destroy command since by default is not enable. To do so we will need to run the following command:

node run -node <node_name> options nodescope.reenabledcmds 'aggr=destroy'

4. Once Aggregate Destroy is enable, we are deleting does aggregate by typing the following command:

system node run -node <nodename> -command aggr destroy <aggregate_name>

5. Confirm by selecting yes

6. After removing those aggregates, we will disable the Destroy command option. This will bring back the other command options that were locked previously such aggregate status. To do so, run the following command:

node run -node <nodename> options nodescope.reenabledcmds ' '

7. Let confirm if those foreign aggregates were remove. Run the following command:


system node run -node <nodename> -command aggr status


As you notice on the above image, those foreign aggregates are now gone.

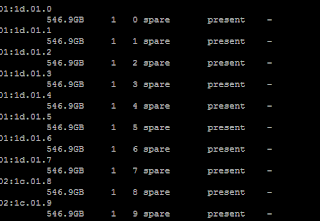
8. After I deleted those aggregates, I proceed to verify the status of my SAS disk by running the command disk show -type SAS


Notice all my disks are now spare and they are not part of an aggregate.

If you are running OPTAP 8.3 and later versions, please refer to the NetApp KB 1013046.